1. Easy Melting Snow Man Cookies

Who doesn’t love Christmas themed cookies?  These lovely easy melting snow man cookies will definitely be popular not only with your kids but with adults as well.  Want to try them out?  

All you need is…. (make 24 cookies)

1 1/4 cups sugar

1 cup Butter, softened

1/4 cup firmly packed brown sugar

2 large Eggs

2 teaspoons cream of tartar

2 teaspoons vanilla

3 cups all-purpose flour

1 teaspoon baking soda

1/2 teaspoon salt

For decorating you will need what ever you and your kids feel like. But incase if you want to have it easy and don’t want to worry much about what to use and how, we can suggest this for you: 

6 ounces vanilla-flavored candy coating (almond bark)

24 marshmallows

Decorator candies, as desired

Start off by heating the oven at 375°F.  In a bowl beat sugar, butter and brown sugar on medium speed.  Beat eggs, cream of tartar and vanilla until well mixed.  Add and beat on low speed flour, baking soda and salt.    Once mixed well, shape dough into 24 balls and place onto an ungreased cookie sheets, 2 inches apart.  Bake 10 – 12 minutes or until edges are lightly browned.  Cool on cookie sheet for 1 minute and transfer to a cooling rack until completely cooled down.

Melt the candy coating as per package instructions.  Spread 1 tablespoon melted candy coating in centre of cookie to look like melting snow.  Make 1 snowman at a time.  Place a marshmallow onto cookie for head.  Now ask the kids to have fun and decorate the snowman as desired by adding face, scarf, buttons, arms etc.  Use candy coating to attach if necessary.  Once done move on to the next snowman.  You might need to rehear the candy coating.

If you would like the snowman’s head to appear as if melting, microwave marshmallows for 5 – 10 seconds.  Be careful not to over soften it and puff up.  Attach to cookie, by pressing down on marshmallow to flatten slightly.  Decorate as above.

Enjoy!

2. Snowman Sugar Cookies

Sugar Cookies are delicious….and if in the form of a snowman they are even more delicious.

All you need is…

  • 280gr all purpose flour
  • 1/2 teaspoon baking powder
  • 1/4 teaspoon salt
  • 180gr unsalted butter (softened to room temperature)
  • 150gr granulated sugar
  • 1 large egg (room temperature)
  • 2 teaspoons pure vanilla extract
  • optional 1/4 – 1/2 teaspoon vanilla extract

For the Royal Icing you need…

  • 480gr sifted confectioners’ sugar
  • 3 tablespoons meringue powder
  • 9 – 10 tablespoons water at room temperature
  • Food coloring – black,orange and red.

In a medium bowl whisk flour, baking powder and salt together.  Set to the side.  In a larger bowl, use a hand mixer or a stand mixer (paddle attachment) and beat butter and sugar on high speed until smooth and creamy.  Add egg, vanilla and almond extract (if using) and beat on high speed until well combined.

Add the dry ingredients to the wet ingredients and mix on low, until well combined.  Add 1 tablespoon flour at a time if the dough seems too soft.

Divide the dough into 2 equal parts.  Roll each portion to about 1/4 inch thickness.  Stack the pieces between parchment paper and refrigerate for 1-2 hours or up to 2 days.  Once chilled preheat the oven to 350°F and using a snowman cookie cutter, make snowman shapes.  Bake for 11 – 12 minutes until lightly browned at the edges.  Allow the cookies to completely cool down.

For the icing, using a hand mixer beat all the icing ingredients together on high speed for 5 minutes.  When lifting the whisk up, the icing should drizzle down and smooth out within 10-15 seconds.  Add a little more water if too thick.  If too thin add a little more confectioners’ sugar.  Use three bowls for different coloured royal icing.

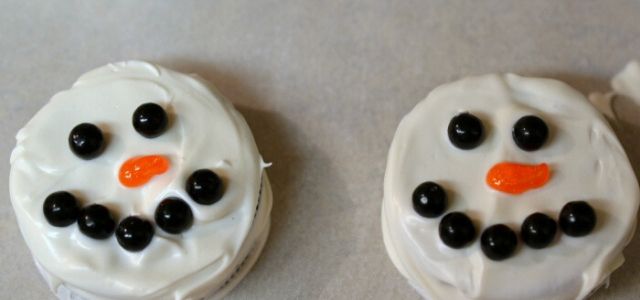
Now you can enjoy decorating the snowman cookies, with red scarf, black hat and buttons and orange nose.  The icing will be complete set in about 2 hours at room temperature.

Enjoy!

3. Snowman Christmas Cookies

Get creative with these Snowman Christmas Cookies.  Have fun making different hats and facial expressions.  A great Christmas Treat for children.

All you need is…. (makes 24 cookies)

  • 200gr self raising flour
  • 100gr caster sugar
  • 100gr butter plus extra for greasing
  • 1 large free range egg, lightly beaten
  • 1 tsp vanilla extract

For the decorations you need white and blue fondant icing, white and black writing icing, sprinkles and 48 small chocolate balls.

Start by preheating the oven at 350°F.  In a bowl mix the flour and sugar together and then rub the butter with your fingertips until the mixture resembles like breadcrumbs.  Add egg and vanilla essence and mix to form a soft dough.

Roll on a well floured surface and cut into rounds.  Place on greased baking sheets and bake for 10 – 12 minutes.  Allow to completely cool.

To decorate roll out the white fondant icing and cut out circles that are the same size as the biscuits.  For the fondant to stick, brush the back of the circles with a little cooled boiled water.  Smooth the icing as you stick it.

Roll out the blue icing and cut more circles and cut in half.  Use a little more water and stick on top of the white icing.  These will be the hat.

Brush the hat with water, and have fun decorating with sprinkles.  Pipe decorations on the hat with the white writing icing.  Pipe a small blob for the hat bobble and another for the nose – stick on the chocolate balls.  Pipe black eyes and mouth then leave to set.

Enjoy!

4. Easy Snowman Oreos Cookies

These Snowman Oreo cookies cannot get easier than this.  Set up an assembly line with your children and have fun decorating.

All you need is…

  • Oreo cookies
  • White candy melts
  • Orange decorating gel
  • Black decorating pearl candy
  • Parchment paper

Set up the parchment paper, so cleaning afterwards will be easy.    Melt the white candy melts according to the package instructions.  Now you can start your assembly line, by dipping the oreo cookie in the melted white candy.  Coat evenly and place on the parchment paper.

You need to work quickly now.  Use the black candy pearls – two for the eyes and five to create a smile for the snowman.

Let the snowman sit, whilst the coating hardens.  Once set use the orange decorating gel to draw a little carrot nose.

Now just enjoy the Snowman Oreo cookies!

5. Simple Snowman Cookies

You will not believe how easy these snowman cookies are to make Your kids will definitely have a blast decorating these snowman cookies.

All you need is…..

  • White Fudge covered Oreos
  • Food safe writing markers
  • Orange decorating gel or royal icing
  • Candy corn (optional)

Allow your kids to use the food markers to give your snow people cute faces and accessories such as a hat.  If you are using the candy corn, cut the yellow end off and use an orange food marker to color in the white end for the snowman’s nose.  You can also use the orange decorating gel to give your snowman an adorable nose.

What is important is to let your kids imagination run, and have fun whilst decorating these cookies.